Blog Archives

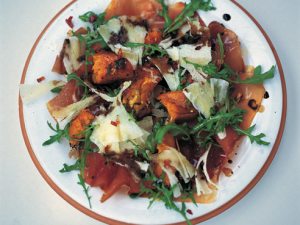
Prosciutto and pumpkin salad


I know, it’s cold and you’re not totally thinking about salad at the moment – but this one is warm and let’s face it – we don’t want to eat heavily all the way through winter. We have to give our body’s a break from the carbs! Well, that’s what I keep telling myself anyway 🙂

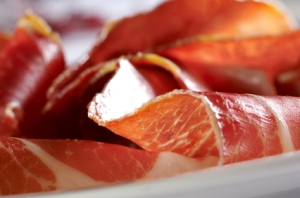
I love the nutty flavours of pumpkin in this recipe, mixed with the salty prosciutto and peppery rocket. If you don’t have prosciutto – you could also cut a few rashers of bacon into largeish pieces, fry them off and add them to the mix instead. It’s also great to take to work for lunch 🙂

Prosciutto and pumpkin salad

  • 1 butternut pumpkin
  • olive oil
  • sea salt and freshly ground black pepper
  • Half a teaspoon of chilli flakes
  • 1 teaspoon of ground coriander
  • 20 slices of prosciutto (you can get this at all good delis and even at your local supermarket)
  • 4 handfuls of rocket
  • 6 tablespoons extra virgin olive oil
  • 4 tablespoons balsamic vinegar (please buy the best balsamic you can find – it makes ALL the difference)
  • 1 small block of parmesan cheese

Method

Preheat your oven to 190°C. Peel pumpkin, remove the seeds and cut into largish cubes. Lay in a roasting tray, season with salt and pepper, the coriander and chilli flakes and drizzle over a little olive oil. Use your hands to rub the mixture all over the pumpkin. This is the best way to get the flavours going – it beats using a spoon any day. Roast the pumpkin for half an hour or until soft and golden. Allow to cool a little.

Lay your prosciutto over a large serving platter – let it twist and turn so it doesn’t look neat and flat. Put the pumpkin around the meat and then sprinkle over the rocket. Drizzle over a little extra virgin olive oil to dress the leaves, as well as the balsamic. Use a vegetable peeler to shave over the parmesan.

If you wanted something to go with it – some really simply grilled chicken would be great.

As for a song to groove to while you whip this up – I think something light and refreshing is in order. The Script are an awesome Irish band – and their song This Is Love is inspiring. You’ll want to play it over and over 🙂

What’s flicking through on your iPod at the moment? Share your favourite tunes in the comments section below and keep us all inspired!

Super-quick pasta with pancetta, olives and basil


Food that is full of flavour, but quick and kind on the budget – that’s exactly the thing I love to eat mid-week and this pasta dish is perfect.

First, lets talk flavour – olives, pancetta (or bacon is a fine alternative) are an awesome combo accompanied by tomatoes and some nice fresh basil. No basil in the house? Parsley is fine too, or even some baby spinach leaves.

The best thing about this is it’s something everyone can whip together as long as you have some form of pasta in the cupboard, tomatoes (canned or fresh), some form of bacony meat (pancetta, bacon, even some ham or salami would work really well) and some fresh herbs or other greenery. Even the olives are optional – although I think they are the highlight of this dish. I used huge green pitted olives which I sliced – but you could use kalamata olives, or even black ones – whatever is handy.

As for price and time – I think you can see it’s not something that’s going to take ages to cook – including prep, absolutely no more than 20 minutes. There’s very few ingredients and flexibility to use up what you have in the fridge – so in the cost stakes, it’s very economical too.

Ok, enough convincing – more recipe writing!

Super-quick pasta with pancetta, olives and basil

Serves: 4

  •  250gm of dried pasta (I used spirals, but anything goes)
  • 1/2 a cup of cubed pancetta (or three middle bacon rashers sliced, or even the same amount of salami would work well too)
  • 3 spring onion stalks, chopped (or a small onion, peeled and chopped)
  • 200gm of green olives, pitted and sliced (these are optional or you can use whatever olives you have around)
  • 1 400gm can of chopped tomatoes (or the equivalent of fresh)
  • 1/4 cup of white wine (only if you have it)
  • 1/4 cup of fresh basil leaves, torn (or parsley or spinach leaves would work well too)
  • Freshly ground pepper

Method

Place a large pot of water on the stove to boil – and add two teaspoons of salt. Bring to the boil and add your pasta. Cook as per packet directions.

While the pasta is cooking, in a large fry pan, add the pancetta (or whatever meat product you choose) and cook for two minutes until browning. Add the spring onion (or onion) along with the tomatoes and wine (if using) and bring up to a brisk simmer. Season with pepper and allow to cook.

Drain your pasta and add it top the sauce, along with the olives and fresh herbs. Stir through and allow to simmer for a minute or two to allow the sauce to stick to the pasta. If it looks a little dry, add some water until you are happy with the consistency.

Serve immediately with some garlic bread and a salad, if you can be bothered making one.

Can I freeze it?: Sure can – in an air-tight container for up to three months. Thaw before re-heating for best results. You may need to add some water while re-heating, as freezing can make the sauce go dry.

Be Inspired~

Lisa

Creamy mushroom and asparagus risotto


This was the first risotto recipe I ever made, and while I have done many more since, this delicious combination has stood the test of time.

My first attempt was back when I was a 23-year-old sub-editor working the 3pm to 12am shift at a daily newspaper in a country town in New South Wales. Boredom and loneliness was often an issue for me, so I used to entertain myself by cooking up heaps of different dishes. I didn’t have to worry about feeding someone else and what their likes and dislikes were. I didn’t have to stress if the dish took forever, I was on my time, no hungry people (other than my tummy) hovering around. As a tribute to my solitude, I went a little crazy with my culinary experiments. The best part for me was that if one of my far-fetched dishes turned into an inedible mess, I would be the only one going to bed hungry.

So, I headed to the shop, brought a packet of alborio rice, and looked at the back of the packet to find this very recipe (which I have since adapted). I then proceeded to walk around and around the supermarket, finding the bits and pieces I needed. One thing I discovered about myself during this lonely phase (I learnt a lot, actually) was that without a little direction – I get totally lost and distracted in supermarkets. I used to go from the freezer section to the deli and then up to the biscuit isle, before realising I forgot the parsley in the fruit and veg section. I’d then think; “ice-cream, would be nice …”  so off I’d go to the other end of the shop.

 My fiancée would attest that I’m not much better when accompanied by someone willing to carry my basket of goodies – but I do try to stay focused!

Anyway, I digress –  back to the risotto.

I cut up all my ingredients (something I recommend doing when cooking any dish for the first time, especially when using a new technique – it keeps things a little more organised and helps with timing) and I got underway. I added rice and wine and stock and stirred it round and round as I did so. I got a little bored with the stirring, so I phoned a friend, holding the phone with one hand and my wodden spoon with the other. We had a good old chat! 

In the finish, it came out ok. Although it was a bit dry, and it got stuck to the bottom of the pan.

But I pressed ahead and served my little experiment into a nice bowl. I then took up my position on my old, uncomfortable futon couch, in my holey, but very comfy PJs you would never let a boy see you in for how unsexy they were. All this was completed with a nice drop of wine in my very best coffee mug, perched on the floor beside me. Upon the first bite, I discovered I had produced a meal that was, well, quite uncooked. Ok, it was crunchy. I obviously hadn’t persisted long enough with the ladelling of stock and stirring of rice.

But, the flavours were all there – it was just the texture that was wrong. I did eat it all too. I was hungry and it was too cold and too late to head out for Maccas.

I bet you aren’t keen to try this recipe now – but you really should. Honestly! Learn from my mistakes and you’ll do as well as my second attempt – which turned out fabulously well!

Tips to perfect risotto:

  • Taste the rice before you decide it’s ready, and continue to ladel and stir until you get the right texture, which is soft with the subtlest bite to the rice – it should be creamy and loose.
  • Heat your stock in a pot beside your risotto pan – it takes less time for the rice to absorb hot stock then cold, making it much, much quicker.
  • Use a non-stick frypan – trust me, this is a good idea!
  • Cook the risotto at a high heat and don’t stop stirring! The stirring releases the starch from the rice, making the risotto creamy.
  • Always check your seasoning and add salt and pepper to taste.
  • The other trick I discovered was that it’s worth getting someone to give you a hand with the stirring – this means employing a spouse, friend, teenager etc to do this for you. Best idea ever!

Creamy mushroom and asparagus risotto

  • Tandoori Chicken Risotto
  • 600gm of chicken thigh fillets, cut into 2cm cubes
  • 1 large onion, finely diced
  • 1/4 cup of pancetta, diced
  • 200gm of alborio rice
  • 1/2 a bottle of white wine
  • 4 portabelo mushrooms (or whichever ones you like), sliced
  • 1 litre of chicken stock (you will probably use less than this, but best to have it on hand)
  • 3 bunches of asparagus, trim away the woody bit, leaving the spears
  • 2 handfuls of grated parmesan (a good quality one)
  • 3 tbs of thickened cream
  • salt and pepper to taste

Method:

Put the chicken stock into a saucepan and bring to the boil before turning right down.

Heat a little olive oil in a non-stick pan and cook the onion over a low heat, until it is beginning to soften. Add the panchetta and cook for a further two minutes or so.

Turn up the heat and add your chicken. Cook for about five minutes, then add the alborio rice.

Stir so that all the grains are coated and really hot, but don’t burn them. Add all the wine. It will bubble a lot (if it doesn’t, your stove isn’t hot enough). Stir until the wine has absorbed. 

At this point, start ladelling your stock in. Put one ladel full of stock in at a time and stir each until it has absorbed into the rice before adding the next. This will take about 20 to 30 minutes. Ensuring your stock is hot before adding it will quicken the process.

After about 10 minutes (so the rice should be half-cooked) add the mushroom and asparagus.

 The only way to tell that it’s ready it to taste it, as mentioned previously. Make sure the risotto is nice and lose and creamy – it shouldn’t be dry and stodgy.

Finish with the cheese and cream. Once you have stirred it through, you might like to add a touch more stock, as the cheese can thicken the risotto.  

Whether you have tried cooking risotto before or not – this is a great recipe and I promise, as long as you taste and stir, it will be lovely, creamy and comforting! Why not make it the next time you have an afternoon free, your next anniversary dinner when the kids are elsewhere or for your next dinner party.

This recipe really isn’t one to freeze. You can if you want, but the texture will change. Add some water when reheating if you’d like to try it.

Be inspired~

Lisa

The Weekly Cook Up: Spezzatino di manzo (Italian beef stew)


My mother-in-law-to-be whipped this up for dinner on Monday night, and it was so super tasty, I just had to share it with you.

It does take more than 2 hours to cook – but the meat was so tender and succulent and the pancetta and wine added so much beautiful flavour. What can I say, I just loved every mouthful – and I’m not just saying that to get brownie points with my future in-laws 🙂

I know most of us don’t have time to do this on a weeknight – but it’s a perfect weekend meal, and with a fancy name like Spezzatino di manzo – your friends are sure to be impressed if you served this up at your next dinner party. It’s also an ideal recipe for The Weekly Cook Up, because it can be cooked and frozen in preparation to take the pressure off later in the week when time is more precious.

Spezzatino di Manzo (Italian Beef Stew)

  •  1/2 a cup of plain flour
  • 1.5kg of chuck steak, cut into 5cm pieces
  • 1/4 cup of olive oil
  • 100gm of pancetta, cubed
  • 2 carrots, finely diced
  • 2 sticks of celery, finely diced
  • 1 brown onion, peeled and finely diced
  • 2 garlic cloves, crushed and chopped
  • 1 cup of dry white wine
  • 400gm tin of chopped tomatoes
  • 1 1/2 cups of beef stock
  • 1 tbs of chopped, fresh rosemary
  • 1 tbs of chopped, fresh sage (or 1 tsp of dried)
  • 2 tbs of capers, rinsed, drained and chopped
  • 1/4 cup of flat leaf parsley, chopped

Method

Place flour in a large freezer bag and season with salt and pepper. Add beef and shake to coat.

Heat 1 tbs of oil in a large, heavy-based pan over a medium to high heat and brown the meat, in batches, until it’s all browned and sealed. Set aside.

Add a little more oil to the pan and fry the pancetta, carrot, celery, onion and garlic for about 5 minutes, or until soft.

Turn up the heat and stir in the wine, scraping the bottom of the pan to remove the nice, flavourful brown bits at the bottom.

Stir in the beef, tomato, stock, rosemary and sage and bring to the boil.

Reduce the heat to low, cover and simmer for 1 hour and 20 minutes. After this cooking time, remove the lid for a further 40 minutes, allowing the sauce to thicken.

Finally stir through the capers and parsley and check the seasoning, adding salt and pepper to taste.

Serve with some yummy, creamy mashed potato.

Be inspired~

Lisa

Light and lucious – prosciutto and ricotta panini


With the Easter Bunny visiting most of us on Sunday, I know I’m feeling like something light for lunch.

Matt and I were chilling on the couch one day watching Giada De Laurentis’ Everyday Italian cooking show. When we saw her whip up this simple dish, we both agreed we had to give it a go. We are both lovers of the good old toasted sanger – this is just a slightly fancier version with prosciutto instead of ham and ricotta instead of your standard cheese. But, it’s just as easy. When Giada did it, she didn’t add tomato – but I like to – along with a bit of baby spinach. Matt prefers the simple version – but the thing I like about it was I never thought of using pita bread in this way. You could really fill it with anything you like.

Because it’s so simple, you can easily whip this up at work for a quick and easy lunch, or on the weekend when you have unexpected guests. Pita bread freezes really well, so it’s easy to always have it on hand.

Prosciutto and Ricotta Panini

  • 2 pita bread rounds
  • 6 slices of prosciutto
  • 1 tomato, sliced
  • 1 cup of baby spinach
  • 200gm of smooth ricotta cheese
  • the juice of half a lemon (or to taste)
  • a pinch of sea salt and ground black pepper

Method

Pre heat your sandwich press until it’s nice and hot.

Lay the pita breads out on your bench. In a small bowl, combine the ricotta, lemon, salt and pepper and stir well. Taste it and adjust seasoning to taste.

Spread half the ricotta mixture over half of the pita bread, and then cover it with the sliced tomato, half the baby spinach and prosciutto. Fold the uncovered side of the pita in half, over the ricotta, tomato and prosciutto and then fold it in half again, making the pita a quarter of its original size. Place it in the sandwich press and cook until the filling is hot and the pita is crispy and golden. Repeat the process for the second pita.

This is great served on its own, or with a light salad. Mix and match the fillings – avocado instead of ricotta would be tasty. Have fun with it!

Be Inspired~

Lisa

P.S Don’t forget to “like” Uforic Food on Facebook! https://www.facebook.com/pages/Uforic-Food-blog/209918879032527

The Weekly Cook Up: Australian fusion food


Aussie food to me is all about fusion. Australia is a multicultural extravaganza of flavours from across the world, reflecting our population – people who have come together from all over the world to call this beautiful country home.

In the 1950s you might have said Australian cuisine was about meat pies, fish and chips, snags on the barbie, the Sunday roast  … and, of course, let’s not forget Vegemite!

But since then our pallets have been wowed by the fabulous flavours of countries like Italy, China, India and more recently, the wonder that is African food.

As you walk down the streets of any of Australia’s beautiful states and territories, you are spoilt for choice when it comes to world cuisine – and then there are those restaurants which classify themselves as “Modern Australian”.

It is this term which I think really encompasses what Aussie food is all about in 2011. It’s about flavours and techniques from across the world coming together to compliment and enhance the things we love and do well here, like seafood, lamb and chicken and an array of fresh produce.

I also think it’s important to embrace indigenous culture and flavours and bush herbs such as lemon myrtle, which is a feature of my recipe, have become really popular.

World famous chef Rick Stein’s pursuit to find Australia’s Top Food Blogger and the country’s ultimate dish inspired me to create this recipe. It embraces our wonderful produce, and the flavours and techniques from all over the world which has influenced our cuisine so much.

Rick Stein Food Odyssey Live On Stage

The chicken in this recipe is succulent and infused with the flavours of basil and lemon myrtle. The potatoes are crispy and delicious, just like you’d expect from a perfectly cooked Sunday roast. The sausages give a really authentic Aussie touch, with a Balkan twist, and the beans don’t only add colour, but a crispy freshness. When brought together, it’s un unpretentious dish that is fragrant, moist and bursting with flavour.

In a nutshell – it’s the kind of food everyone just loves to eat.

BAKED FUSION CHICKEN

Serves 6-8

Marinade:

  • 16 organic chicken drumsticks (you could also use maryland or thighs, if you like)
  • 2 tbs of basil pesto
  • The juice of 1 lemon
  • 1 tsp of lemon myrtle
  • 2 cloves of garlic, grated
  • 1 tsp of sea salt
  • 1 tsp of freshly ground black pepper
  • 3 tbs of olive oil

Combine all of the marinade ingredients. Massage into the chicken, cover with cling film and refrigerate for at least 2 hours.

Remaining ingredients:

  • 1 red onion, peeled and cut into wedges
  • 3 potatoes, peeled and cut into wedges
  • 6 small, skinless pork sausages (also called chevaps, which are actually Balkan), broken into bite-sized pieces
  • 8 mushrooms, halved
  • 4 whole cloves of garlic, unpeeled
  • 4 vine-ripened tomatoes, cut into quarters
  • 1 large handful of beans, trimmed
  • 1/3 of a cup of water
  • 1 tbs of flour

Method:

Preheat your oven to 220 degrees celsius (200 for fan forced). In a baking dish, combine the marinated chicken, red onion, potatoes, sausage pieces, mushrooms and garlic with a few good glugs of olive oil and some salt and pepper. Toss with your hands so the marinade coats all the ingredients.

 Bake for 50 minutes, checking after 35 minutes to see how it’s progressing.

After an hour, add the tomatoes and beans and stir through. Try to ensure the potatoes are mostly at the top, so they don’t go soggy in the juices, letting them to go golden and crispy. Taste the sauce to check for seasoning and add more, if required. Bake for a further 15 minutes – enough to cook the beans and tomatoes, but so the tomatoes hold their shape. 

Serve onto plates, but leave most of the juices in the pan. Place the pan on your stove-top and bring to a gentle boil. Mix the flour and water in a small bowl and add to the simmering juices. Whisk until the sauce starts to thicken. Once a good consistency, spoon over the chicken. Garnish with chopped parsley.

I think this dish doesn’t only reflect the flavours that have been brought to Australia over the past 60 years – but it also reflects the kind of food Australians like to eat every day- food packed with flavour, but without fuss and pretension.

I hope this dish is something my Food Hero, Rick Stein would love! I guess we’ll just have to wait and see!

Be Inspired~

Lisa

Vanilla bean panacotta with strawberry salad


It may look and taste fancy, but this vanilla bean panacotta is super easy!

I learnt this during the Masterclass I had last month with Oakdene restaurant head chef Marty Chichester where we also made oysters, chilli mud crab and lobsters with garlic butter. It was an amazing experience for me, because I was intimidated by all the ingredients we cooked with that night. But, once I knew what I was doing I discoveed that these types of seafood are quite easy to prepare – and I know it would even be the case for people who aren’t too confident overall in their cooking abilities. In saying that, put these dishes in front of your friends the next time you invite them around for dinner, and they’ll be nothing short of impressed. So, if you missed those great recipes, be sure to check them out and give them a try. If you follow the recipes and tips, you can’t go wrong.

This dessert is the same. It sounds daunting, but it’s not at all – and this is coming from someone who’s terrified of making sweets!

The strawberry salad is also simple, but gorgeously sweet and scrumptious. strawberries are in season at the moment, so now is the best time to give it a try. It’d also work very well with some pancakes, or as a side to a rich chocolate cake.

Vanilla Bean Panacotta

  • 200ml of thickened cream
  • 75ml of full cream milk
  • 1/2 a vanilla bean, split and deseeded
  • 1/2 a sheet of gelatin
  • 50gm of sugar

Method

Dissolve the gelatin in ice-cold water for 10 minutes, until it becomes pliable.

Heat the cream, milk and sugar until just before it boils. Do not let it come to a boil, so it’s best to stay with the pan while it’s heating and remove it as soon as you see the liquid starting to wobble.

Remove from the heat and let it stand for 10 minutes.

After the 10 minutes is up, remove the gelatin from the water and squeeze out the excess water.

Add it to the panacotta mix and stir it until it dissolves completely .

You can pass the panacotta liquid through a fine sieve at this point, but I actually like the look of the little black dots from the vanilla bean. It’s up to you.

Pour the mixture evenly between four cocktail glasses. and pop them in the fridge straight away. It’ll need to set for about two hours.

The other great thing about this recipe is it’s pretty quick, but can be made the night before. When you are ready to serve, make the strawberry salad, which is so simple it doesn’t need a recipe.

Remove the green tops from a punnett of strawberries. Cut into quarters. Place in a bowl and mix with 2 tsp of icing sugar. Taste one of the strawberry pieces. If you think it needs a little more sweetness, add some more icing sugar until you are happy with the flavour. I think next time I make this I’ll add a touch of masala. I think it would taste gorgeous!

To serve, scoop the strawberry salad on top of the panacotta.

You will enjoy every mouthful of this dessert. Once you have made it once, I’m sure it will become a recipe you’ll make over and over and your friends will be begging you for the recipe!

Chicken with rataouille and risoni


This recipe is fantastic because it’s very balanced – it has protein, veg and carbs – and best of all, it’s absolutely delicious and freezes extremely well.

I’m really wanting to inspire busy people to cook at the moment – setting aside a day a fortnight, or even a month, to have a big cook up and fill the freezer with yummy dishes. Not only will it reduce the stress in your life, but it will also ensure you and your family are eating good, healthy food, that won’t break the bank.

I had some really awesome comments on my post on freezing food the other day – click here to read the post and the tips and tricks Uforic Food readers offered on how to do it successfully.

This post set records for readership on this blog, so I figure it’s the sort of thing people are really interested in. I know I am seeing as I am trying to cook meals for my dad and stack his fridge with yummy goodness!

So, this recipe is one of the ones I cooked the other night (I found it on taste.com.au) – because it’s very much ideal for freezing, and because it’s such a complete meal, you don’t have to worry about trying to think of something to go with it which will freeze well.

Chicken with Rataouille and Risoni


  • 1 large eggplant, cut into 2.5cm pieces
  • 2 large zucchinis, thickly sliced
  • 1 red capsicum, halved, thickly sliced
  • A good drizzle of olive oil
  • 8 large chicken drumsticks
  • 2 cups Italian tomato pasta sauce (or you could make my marinara sauce, click here for the recipe)
  • 1/3 cup dried risoni pasta
  • 1/2 cup basil leaves, chopped

Method

Preheat oven to 240°C. Place eggplant, zucchini and capsicum in a large roasting pan. Drizzle lightly with olive oil and some salt and pepper and use your hands to toss the vegies and ensure all the vegies are lightly coated. Roast for 25 to 30 minutes or until light golden.

Meanwhile, heat a heavy-based saucepan over high heat. Add a little olive oil and cook the drumsticks in batches, turning occasionally, for 5 minutes or until light golden (you could use thigh fillets as well, if you like). Return all chicken to saucepan. Add pasta sauce. Reduce heat to medium-low. Cover and simmer for 10 minutes. Stir in risoni. Cook, covered, for a further 10 minutes or until chicken is cooked through. Do keep an eye on it to make sure the risoni doesn’t stick to the bottom of the pan.

Stir in roast vegetables and basil. Season with salt and pepper.

Serve or transfer to containers for freezing.

This recipe is so easy and simple, but the roasting of the vegetables really adds a lovely depth of flavour. I know some people would like to use breast chicken for this. However, I really urge you not to, I think it would really take away from the flavour.

If you have a recipe that you’d like to share – email me at lisa.foreman_media@yahoo.com.au . I’d love to hear from you 🙂

Be Inspired~

Lisa

Your last meal … what would your menu be?


I hope I’m never in the position where I have to choose my last meal … but I have often thought about what the menu would be like if I knew I was about to consume my last dinner on this planet.

I recently read an article in the UK’s Guardian newspaper, where they asked celebrity cook/chef Nigella Lawson, Gordon Ramsay and Heston Blumenthal what their menu would be for their last supper, who would cook it and who they would share it with.

This is what these chefs – who I’m sure have tasted more food than any of us Average Joes could ever dream of – selected for their departing menu. Now I must disclose that this article was written in 2007 – so their tastes may have changed, but I still think it was very interesting. 

 Gordon Ramsay 
 

photo sourced from http://www.insidesocal.com


Ramsay told the Guardian:

I would start with golden caviar from the albino sturgeon served with an ice-cold bowl of tomato consomm. I cant think of a more exquisite way to start a meal. To follow, a wonderful fillet of Aberdeen Angus beef, studded with black Perigord truffles and perfectly roasted, served with the ultimate indulgence pomme pure de Joel Robuchon, with grated white Alba truffle. Dessert would be a chocolate fondant with white milk ice cream. He said the starter would be cooked by Alain Ducasse, main course by Joel Robuchon and dessert by his wife, Tana Ramsay – so they can eat it together. Awww, how sweet!

Somehow this menu wreaks with arrogance … I wonder why that is? LOL I was touched by the fact he said he would share it with his wife and kids – but after recent scandals in the marital department, who knows if he was being truthful. 

An interesting menu, none the less.

Now, onto the chef/science extraordinaire …  


Heston Blumenthal

Photo sourced from The Telegraph.co.uk

Blumenthal told the Guardian:

Originally I thought of a huge banquet so it would last a very long time. You know, Charles II once had a banquet for five people, which consisted of 173 courses. One course comprised 15 desserts and another seven puffins, or something like that. It would probably take a lifetime to finish so realistically, if it was my last ever supper, it would probably be Sunday lunch with roast potatoes.

 What a surprising choice for a chef that is all about bringing science and preciseness into the kitchen! He also said he would cook it himself, with his family, so they could all spend time together. Sounds perfect!

Nigella Lawson

Photo sourced from watoday.com.au

She told the Guardian:

Linguine alle vongole, made al bianco, thats to say, no tomatoes, just pasta, oil, a little chilli, garlic, clams, white wine and parsley. Followed by lemony roast chicken, creamed spinach, petits pois la franaise and a fennel salad, with chips, roast potatoes and mash (last meal – why worry about the carbs?) then a wodge of gorgonzola so ripe its about to walk. And the worlds best toffees, Salvators from Fouquet, Paris (Rue Francoise 1er). 

While I can just see Nigella bundled up in bed, in one of her silky dressing gowns, eating the pasta out of the frying pan she cooked it in and munching on a chicken drumstick as she unwarps one of those yummy toffees (God that woman can eat! Love that!) – she generously said she would not only cook it herself, with her children there to lend a hand, but that she’d share it with them too 🙂

So now you know what these ultimate foodies would eat for their last meal – what would you have for yours? Who would cook it and who would you want to share it with?

As for my last meal – and this might sound like weird combinations – but hey, I want to get in all the things I love!

Starter: Seafood soup with white wine, tomatoes, olive oil and basil – By Neil Perry

Main: Hot chicken curry, with yogurt raita – the recipe is by no other than  Jamie Oliver (it’s a very early one from his Naked Chef books)

Desert: Now you aren’t allowed to laugh – but I’d have chocolate mousse – made by restaurant Mexican Graffiti in Geelong, Australia. Who would have thought you could get such amazing mousse from a Mexican restauant!! My brother got me onto this and trust me on this, once you have tasted it, you’ll be left wanting more!

As for who I would share it with – well, that’s easy! Matt, and everyone else that I love. My family, Matt’s family – and all my wonderful, caring friends. While the food would be amazing – the company would be even better!

Share your dream last supper in the comments section below. Can’t wait to read what mouth-watering delights you come up with!

Be Inspired~

Lisa~


Day 24: Put some mussel into it!


As we approach the final leg of The Inspiration Challenge – I realised that I haven’t provided a recipe for my all-time favourite seafood – mussels!

I have discussed them on the blog before – and the steps you need to take to prepare them. But, it never hurts to go over it again.

These little morsels of meaty goodness do take a bit of work before cooking, and sometimes the rules surrounding whether a mussel is safe to eat or not, can be really confusing. But, don’t be afraid! Once you get a hang of how to prepare them, cooking is a breeze.

So, here are a few tips to dealing with mussels.

  • Buy them from reputable fish monger, or even better, straight off the trawler!
  • Once you get your mussels home, you really need to use them that day for the best results. This is one thing that shouldn’t be stored too long. However, if you can’t prepare them right away – pop them in the fridge. Just make sure you don’t leave them wrapped in plastic – they should be kept in a container and covered lightly with a tea towel, to let them breathe.
  • Now for the most important part. As you are going through your mussels, some of them may be slightly open. Give them a sharp tap on the side of your kitchen sink. If they close tightly, they are fine cook. However – if they don’t – you must throw them away. They are dead and no good to eat.
  • To prepare the mussels, give the shells a good scrub to remove any barnacles – I use a rough cleaning pad to do this (a fresh one out of the packet, not one I have used to scrub pots and pans … eewww!). – Remove the beard (that’s the fibrous thing sticking out of the mussel) – give it a good, strong pull and it should come off.

That’s just about it – now it’s time to cook them!

Mussels in a white wine, bacon and garlic sauce with tomato

  • 250gm of spaghetti
  • 500gm of mussels
  • 3 tbs olive oil
  • 5 rashers of bacon, cut into strips
  • 1 red onion, finely diced
  • 3 cloves of garlic, finely sliced
  • 2 red chilli, finely sliced (or you can add more, if you like it really hot)
  • 1 cup of white wine
  • 2 400gm can of chopped tomatoes
  • 1 handful of basil, roughly torn
  • The juice of half a lemon

Method

Bring to the boil a large saucepan of salted water – use this to cook the pasta according to packet directions. Drain and set aside.

Meanwhile, heat the olive oil in the bottom of a large, heavy-based pan. Cook the bacon, until it’s getting slightly crisp – then add the onion, garlic and chilli and season with salt and pepper. Cook over a medium heat until onion is soft.

Turn up the heat and add the wine, allowing it to simmer briskly for a minute or two. Add the canned tomatoes and once they start to simmer, add the mussels.

Cover and cook until the mussels have opened (it doesn’t take long – and this is how you tell they are ready). Add the cooked pasta,  fresh basil and lemon juice and stir gently to combine.

Important: As you serve the dish into bowls, ensure that you discard any unopened mussels. If they are closed, then they are no good.

Serve with some nice crusty bread.

This is a nuts and bolts recipe – but I have been known to add prawns, calamari and also some cherry tomatoes. Get creative and mix it up. I promise your guests will be impressed with this sumptuous dish!

Be Inspired~

Lisa